Wednesday, January 30, 2013

Beeswax candle rolling, a felted Snow Fairy, and our winter tablescape

Our dinner table is our spot to keep a seasonal nature round.  Ours is a piece of log with holes drilled in it for candles.  We decided this week to make some new candles and use the beeswax candle set we'd gotten for Christmas!  It's very simple to use--you cut the wick and roll up the wax sheets.  You can add embelishments if desired.  We went mostly simple this time--a few plain and a bit of decorating.  Q loved it, but I would say that it was on the edge of her ability level.  She's 4.5 and it was a little tricky for her to roll up the candle tightly and evenly, but she was able to do it with some help.  We both had so much fun making our candles!
 

Here's our table scape for winter:
-I felted the snow fairy out of a felted wool sweater, white roving, a snowflake cut from some scrap fabric, and metallic silver yarn for embelishment. 
-a small blue vase (that belonged to my Grandmommy) filled with white clovers we found in the field--because the Snow Fairy loves all things white.
-some clear "jewels"
-pipecleaner snowflakes
-"snow" (cotton)
-pinecones
 

-a little snowshoe hare I made from some playdough we were working with

-some leaf skeletons we found in the field where a pond had begun to dry up
-some moss and lichens on a piece of bark


We really enjoy having a space to keep and look at some seasonal treasures.  Q also found a couple tiny white stones and tiny snail shells that were white that she put on the table, as well!  We enjoy lighting the candles at dinnertime and looking at all our treasures anytime we're gathered around the table.  My kids love contributing to the collection and changing stuff out over the course of the seasons.  
Posted by Picasa

Monday, January 28, 2013

Exodus story of Moses playset (felted!)

I finally got some photos of our Moses playset ready to share!

I'll start by describing what I did. 

The background is a needle-felted and wet-felted piece I made at a felting class I took a few weeks back.  Definitely not necessary for the playset, but nice to set the scene.  The same thing could be made with watercolors or even crayons/markers or completely left out. 

The river is a blue-green scarf.  I added a few stones to set the scene, as well. 

I made all of the women the same way--I cut craft felt (for the mother, sister and princess) or tshirt scraps (2 maids) in the pattern shape.  I made them different sizes depending on the character.  Remember that they'll shrink when sewn, too.  I handsewed them (right sides together) and then turned them right side out.  I stuffed them with batting (I cut open an old bedpillow) and then tied some string around the neck to define the head shape.  For the Princess I also tied a belt around her middle. 

I then needlefelted details on my characters, but this could also be done with hotglue and felt or fabric scraps. 


Here's the pattern--the oval with the flat bottom is the body piece (cut 2) and the small piece is the base (cut 1).  You can adjust the size of your body piece and to adjust your base you just need the length of the long sides to be the same as the bottom of your body piece.  You will actually round off all 4 corners of the base, I just wanted to show that they were the same size in this photo.

So cut 2 body pieces, sew (glue) together right sides together, turn right side out, stuff, tie string to make head, and then handstitch bottom onto body.  I used embroidery thread that matched the body color.  Definitely nothing fancy.

Princess and her two maids:

Moses' mother and sister: 

I felted baby Moses with white roving and a ball of dark brown roving.  You could do the same thing with felt and fabric scraps and a hot glue gun. 

I always like to give opportunities to involve my kids in setting up the scenes for the stories.  For this one I knew I wanted to make a set of reeds (river grass) they could work/play with.  I used my husband's bandsaw to cut a limb into small sections and then drilled holes in each piece.  I had some greenery I cut apart (in different lengths) to stuff into the holes.  It is removable, so the kids can choose which pieces go where and can also put the pieces in and out of the bases.  The little root piece hanging out was on one of the greenery pieces. Great fine motor practice!!

When I first thought about this project I was imagining us gathering real pieces of greenery to use, so that would totally work, too!  I just happened to find this particular greenery in my studio and wanted to put it to use. 

The wire basket was one we already had.  I had also toyed around with using a walnut shell for the basket. 

Quinn loves setting up the scene (a little differently each time).  We have a board book of the story that she can "read" while I act it out with the characters, then we switch and I read from the children's Bible and she moves the characters.  Beck just loves watching and occasionally holding the baby.  Then running off with him and being chased down to get Moses back.  :)

Q has had so many thoughful questions for me as we've explored this story for several mornings.  She's very interested in why the mother would need to nurse the baby and whose baby he would actually be.  So fun to explore the power of God's word with my little ones!

I love letting my kids get "hands on" with the manipulatives and even using them later for extended pretend play.  Such an important opportunities for toddlers and preschoolers.

This playset did take me quite a bit of time.  Several evenings I worked on the items while we watched a movie, etc.  I really consider these to be such important tools in my children's faith development (and maybe someday even my grandchildren's....) that I think they're worth the time.

I hope you aren't immediately turned off to this project if you don't know how to felt.  Or sew.  There are so many options available for making playsets--and you can pretty much do anything with a gluegun!  The Moses story lends itself to making a great playset, so I'd really encourage you to get crafty with the stuff you have around the house and make your own set. 

PS) One day I have big plans for letting my kids act this story out in our little pond!  We'll have to find something that will really float for Baby Moses.  They are going to LOVE IT!

Posted by Picasa

Saturday, January 26, 2013

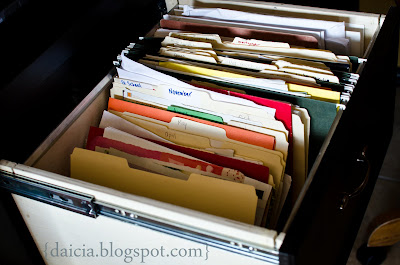
On organizing--my monthly files.

I have several little spots for organizing my teaching things.  Of course I consider the atmosphere of our home one of my learning tools!  I have many files saved on my computer in folders named by month--ideas for January, February, etc.  A lot of people do this on Pinterest.  For me it works well on my personal hard drive. 

I also keep a file of real paper in our file cabinet.  There is a folder for each month.  I file photos from that month--ie: or Valentime card, Christmas photos, etc. and I love to get them out every year during that month.  In our August file I have pictures of Beck as a newborn as well as his first bday photos.  Next August we'll find a good place to put these in our home.  I also file magazine ideas, printouts, recipes, etc. that correspond to certain months or seasons.  I often also store artwork I might want to repost next year at the same time--Valentines the kids made, a winter picture Q painted, etc.  Usually my very favorite pieces of artwork that I want to save and display yearly. 

Each month at the beginning-ish of the month I get out my file and see what's inside and if I'll be using any of it that month.  This is a low-maintnance strategy and it works really well for me!  As you can see it's nothing fancy--my folders don't even match and are repurposed from my public school teaching days. 
 
Posted by Picasa

Tuesday, January 22, 2013

Treasure Ice sensory play


Sunday night I got out two sandwich-sized cheapo tupperwares (the thinner ones make it easier to pop out the ice when you're ready to play), filled them half way with water and dropped in some treasures (beads, flat marbles, stones, colored paperclips, snowflake sequins, buttons, poker chips, etc., with bigger items for the little guy who tries to eat everything).  I froze them for a couple hours and before I went to bed I added another layer of water and a few more items. 
Monday morning I told the kids the river fairies had brought a piece of frozen river for them!  We took them outside, along with a tub of water and some salt.
They had fun touching, holding and dropping their pieces of ice.  We poured salt on, and I was thinking we'd talk about how ice melts faster with salt, but there was really no interest in this--they just wanted to try and get the stuff out! 
After a while we dropped them into the tub of water (I pointed out that ice floats) and they poured water over them to get them to melt.  There was ice play, ice eating, and finally all the treasures came out, so there was even a bit of fighting over whose rock was whos. 
But it was a successful sensory activity--little hands explored new textures, temperatures and surfaces (and little mouths did, too!) and they also absorbed some science concepts about the properties of matter (solids and liquids). 
I think we'll do this again soon!  Easy and fun!

-could be themed (animals, holidays, etc.)
-could be done in an ice cube tray to make individual treasure ices
-could be made edible by using berries
Posted by Picasa

Sunday, January 20, 2013

Winter painting projects

We've been reading the book OH! by Kevin Henkes and Q and I really like the snowscapes.  We decided we wanted to try our hand at painting a snowscape. 

With blue paper and white paint we went to work!  We used the book illustrations for inspiration.
 

And sprinkled glitter on our finished projects, of course!  I just realized I need to post a photo of the finished projects!

Another painting project we did--we glued white doilies to paper and watercolored over them.  We were hoping to peel off the doily and expose the white underneath (I had read about this somewhere on the internet) but the peeling part didn't work very well.  We still like our pretty pictures, though!
 
Posted by Picasa

Winter decor


Last year Q watercolor painted these wooden snowflakes (bought at Hobby Lobby) and we hung them on Beck's playgym for the little guy to enjoy.  This year they are hung from the chandelier over our kitchen table.  We're really enjoying them! 
Posted by Picasa

Backyard Birds of Winter


We've been reading about winter backyard birds.  We've been watching them out our window, as well!
We learned from our book that birds like suet in the winter to give them protein since they aren't eating as many birds.  So we had a project this week of "winterizing" our bird feeding area!

We made a pole in the ground with a branch and hung our suet on it.  We tied another branch on to make a perch for birds to sit while they eat. 

We bought a new bag of seed and put some out!

We rinsed and refilled the birdbath.

And now we've been watching to see what types of birds come to our yard! 

Such a fun way to incorporate practical life, motor skills, science concepts, and literacy skills as we take care of our feathered friends!
Posted by Picasa

Saturday, January 19, 2013

Ikea Easel Hack pretend play hibernation den

Wow, it took longer to type that title than it did to make this whole playspace!!  :)

We are studying winter, and of course we are reading lots of books about winter animals and learning about hibernation.  I decided it'd be fun to have a den to play in!  I took the rack that holds paint off our Ikea easel and draped an old brown duvet cover over it.  I rounded up a white fuzzy blanket to put underneath (snow!).  Ta-da!  It's a den!
 

The kids can crawl in and out.  We collected all the "wintery" animals we have.  It was fun sorting them into animals that hibernate and those that stay out and about during the winter. 

Our wolves, Bear and hedgehog, white winter rabbits (hiding in a hat--we've read the Jan Brett book!):

The cat loves to "hibernate" too.  I was cleaning up and threw a handful of animals inside the den this past week and heard an angry "meooooow" as I hit him with stuffed animals!

I love our Ikea easel as a basis for pretend play areas.  :)
Posted by Picasa

Weekly lesson plan organization

We hold Kitchen School and Baby School on Mondays, Thursdays and Fridays--the days Q doesn't go to kindergarten and I am not at Bible study.  However I typically write 5 days of plans so we have something to do after school and before dinner.

I usually do my lesson planning on Sunday afternoons.  I have manilla folders (and a pile on the desk) of ideas/books that I want to get to, so it's typically pretty easy for me to pull together my week. 

I start with a read aloud book for each kid each day.  Sometimes Beck's is repeated during the week.  I introduce new books that correspond to our seasonal study this way, then once I've shared them with the kids they go on our little bookshelf (actually a rocking chair) in the living room to be revisited whenever we read books. 

We also do rhymes, songs and fingerplays as well as a poem for the month.  I love when I can find a poem illustrated through a book. 

I like to have my plans up where I can see them.  I have an old frame that I glued scrapbook paper over the picture inside.  I use overhead markers to write my plans for the week by the corresponding day. 

Under the squggily line are just ideas of "things to do" if we get bored.  Sometimes when we need something to do I go braindead, so I like to keep some suggestions on hand!  They are simple things--playdoh, board games, etc. 

We also have a memory verse (either weekly or bi-weekly, depending on the verse) that is posted on the little chalkboard next to my plans.

Now, about my lesson plans.  My kiddos are 4 and 1, so our learning revolves around play.  We get to the lesson plans if we get to them.  I find that usually spending an hour or so doing structured activities works well for us.  However some days we totally scrap them.  Playing outside, visits with friends or family, or even the kids being really involved in play are all reasons to put our lessons on hold.  As a result we NEVER get to all of the things I have planned in a week, and that's just fine!  I move things I still want to do but didn't get to over to the next week, and some other things may just get scrapped.  My plans are very loose and sometimes I even move activities around from day to day at the spur of the moment--depending on my kids moods (or mine!) or the weather, etc. 

I do think it's important to plan in time for art experiences, sensory exploration, literacy experiences and for my kids to practice listening and following directions/take turns.  They actually LOVE Kitchen/Baby school!

I don't even type out my plans.  I write them in pencil on scrap paper while I plan and then transfer to the board in the kitchen. 

This is just what is working really well for me at this stage of our lives!  
Posted by Picasa

A spot for tea

As January came, I put away some Christmas items in the playroom and rearranged to start fresh. 
In one corner I made a simple tea area.  Beck is really enjoying taking lids on and off, so I knew he'd have fun with the teapot.  He also loves putting cups over his mouth and talking and listening to the way they "magnify" his voice.  Both kids enjoy playing with nuts....so all of these items were just the ticket for the little tea corner. 

I repurposed an Ikea children's clothesline rack (given to us by sweet friends).  We sometimes use it as a clothesline, but right now I really needed a child-height table.  So I plopped a wooden tray on top and hung a pretty tea towel (hand embroidered by my grandma!) on the front and it worked perfectly.  I love coming up with new ways to use the furniture we have on hand. 

There are also some vintage embroidered coasters.  I have gotten to where I like to put out my pretty linens for us to enjoy rather than keeping them in the drawer "for something nice."  Makes me happy to see them every day!
 
 I also like to change out floor coverings to make little areas.  This brown baby blanket makes a great floor mat under the table (a vintage piano stool). 

I try to set the table in seasonal decor, so this is a blue cloth napkin topped with a paper doily and a wooden bowl of little wooden mushrooms.  They are part of a set of seriated mushrooms in varying sizes, but only the biggest size are appropriate right now with our little man mouthing everything.  I knew he'd enjoy taking the lid off, dumping or removing the mushrooms and replacing them.  Q enjoys passing out the mushrooms to her dolls. 

Near this area I also included Q's wooden doll highchair and a cradle, so it serves as our "home living" space in the playroom.  I typically have a homeliving/baby care area set up at all times, though it may look different from season to season. 

This area promotes practical life (table setting/clearing, food service), pretend play, and fine motor skills.
Posted by Picasa

Thursday, January 17, 2013

Winter Weather Dress Up Play

To go along with our studies of winter, we've had fun getting out all of our "woolens."  We have a scarf, hat, and set of mittens for each of us in the playroom.  I moved our shelf out so the back was accessible and screwed in some little cuphooks to hold woolens.  I love having items displayed individually, as opposed to being in a basket or shelf.  It's so much more fun to select our winter wear when they're displayed so nicely!

And we have a pair of mittens for each person in a little basket.  Next year we may do something with our little clothesline, some clothespins, and the mittens.  For this year the basket is working well.  Little Man loves dumping and refilling it!  And boy does he love wearing mittens or gloves on his hands!

I have a white throw we put down on the living room carpet.  We dress in our warm woolens and go out to play in the "snow."  We practice doing snow angels!  Yup, that's what we have to resort to here in Texas.  :)
Posted by Picasa